Before you start
FlowForge is a Chrome extension that runs your prompts on Google Flow in a batch. You add a list of prompts once and press Start. FlowForge submits them to Flow one by one and saves every image and video to your computer.
To use it you need:
- Google Chrome on a computer (Windows, macOS or Linux). Chrome on phones does not support extensions.
- A Google account that can use Google Flow at
flow.google.com. Everything you generate is created by Flow, using your own Flow plan and credits. - A FlowForge account. You create it inside the extension in about a minute.
Some models and download qualities need a paid Google plan (Plus, Pro or Ultra). FlowForge marks these options in its menus and tells you clearly if something is locked on your current plan.
Install and open FlowForge
- Open the FlowForge page on the Chrome Web Store and click Add to Chrome.
- Click the puzzle-piece icon in Chrome's toolbar and pin FlowForge, so its icon is always visible.
- Open
flow.google.com, sign in with your Google account, and open a project (or create a new one). - Click the FlowForge icon. The side panel opens on the right of the window.
The bottom of the panel shows whether FlowForge can see your Flow tab. If it says No Flow tab detected — open flow.google.com, open a Flow project in a tab of the same Chrome window. The message then changes to Connected: Google Flow.
Your FlowForge account
The account screens (sign in, create account, password and account page) are always shown in English, whatever language you choose for the rest of the panel.
Create an account
- In the side panel, click Create an account.
- Fill in Full name, Email, Password (at least 8 characters), Confirm Password and Country.
- Click Create Account.
- A verification code is sent to your email. Enter it and click Verify Email, then Continue to Login.
Below the button, FlowForge shows that by creating an account you agree to the Terms & Conditions and Privacy Policy.
If the code doesn't arrive within a few minutes, check your spam folder, then click Resend Code.
Sign in
Enter your email and password on the Welcome to FlowForge screen and click Sign In. The eye button inside the password box shows or hides what you typed. The same screen also has Forgot password? and a link to create an account.
Forgot your password
- On the sign-in screen, click Forgot password?.
- Enter your account email and click Send Code.
- Enter the code from your email, choose a new password and click Reset Password.
- When you see Password reset successfully, click Continue to Login and sign in.
One active device at a time
To keep your account secure, it can be signed in on one browser at a time. If you sign in on a new computer while another one is still signed in, FlowForge tells you and offers Log out from other device. Click it to move your session to the computer you're using now.
Your account page
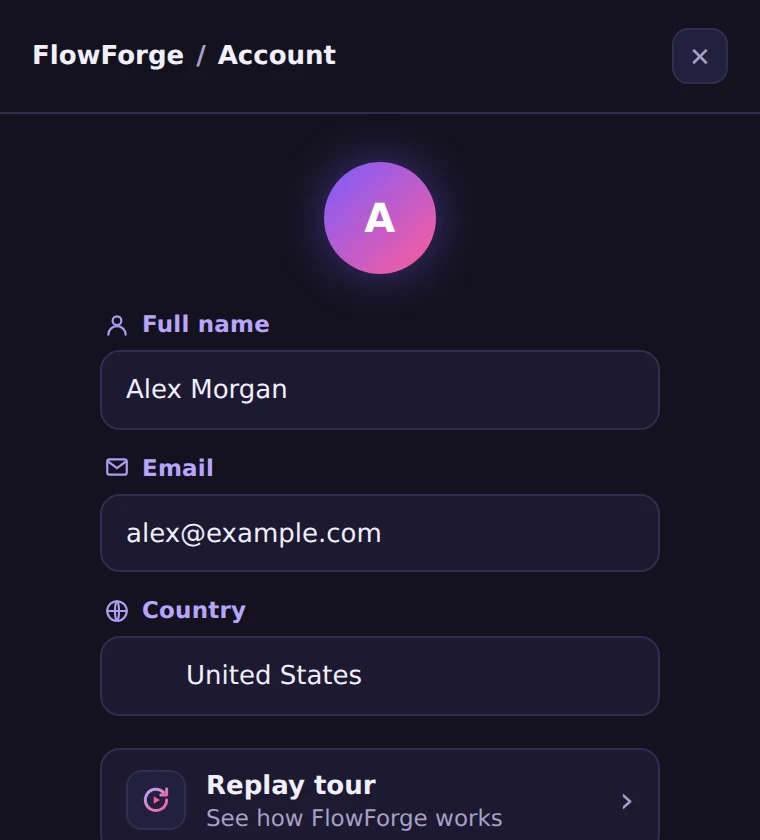
Click the round account button at the top right of the panel. The account page shows your Full name, Email and Country, and gives you:
- Replay tour to watch the welcome tour again.
- Change Password to set a new password. You enter your current password, then the new one twice.
- Log out to sign out of this browser.
- Links to the Terms & Conditions and Privacy Policy.
The welcome tour
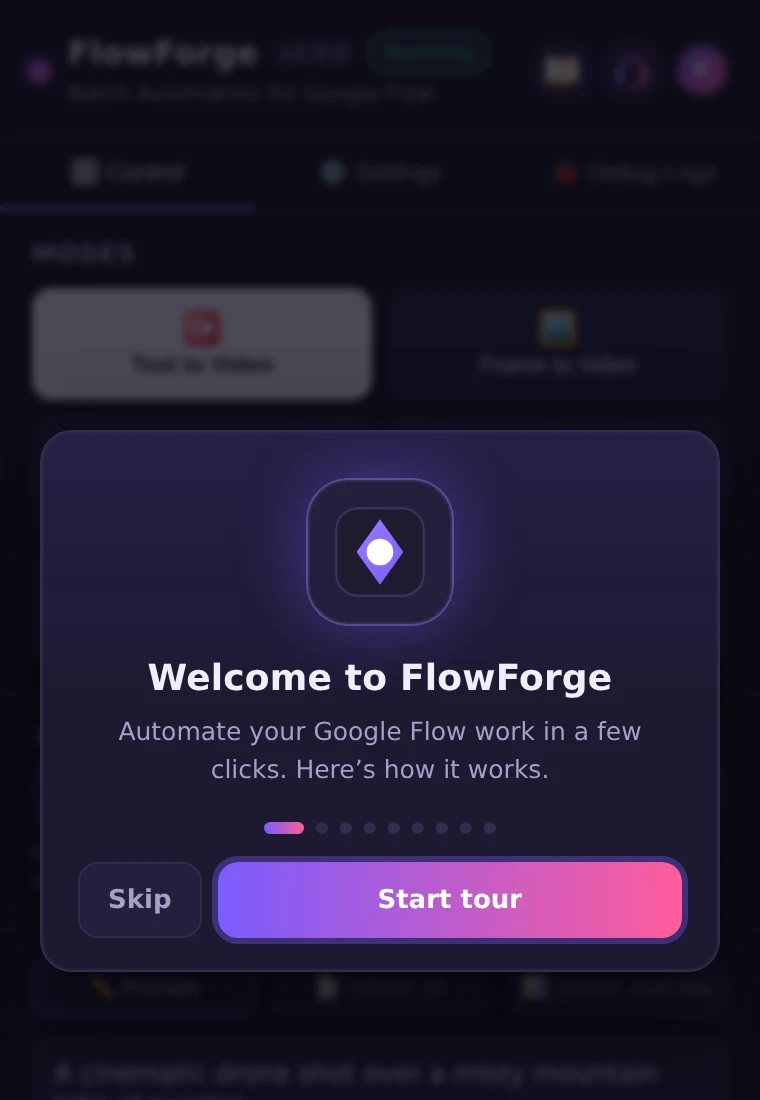
The first time you sign in, FlowForge shows a short guided tour. Each step highlights one part of the panel and explains it:
- Welcome to FlowForge
- Watch the tutorial, with a Watch on YouTube button that opens our video in a new tab. The tour stays open, so you can come back and continue.
- Keep Flow connected
- Choose a mode
- Add your prompts
- Characters, voices & images
- Run your batch
- Settings & Debug Logs
- Help is always here
Click Start tour to begin, Next to move on, and Start creating on the last step. Skip closes the tour at any time. On a keyboard, Esc skips and → moves to the next step.
The tour appears once per account on each computer. To see it again, open your account page and choose Replay tour.
The side panel
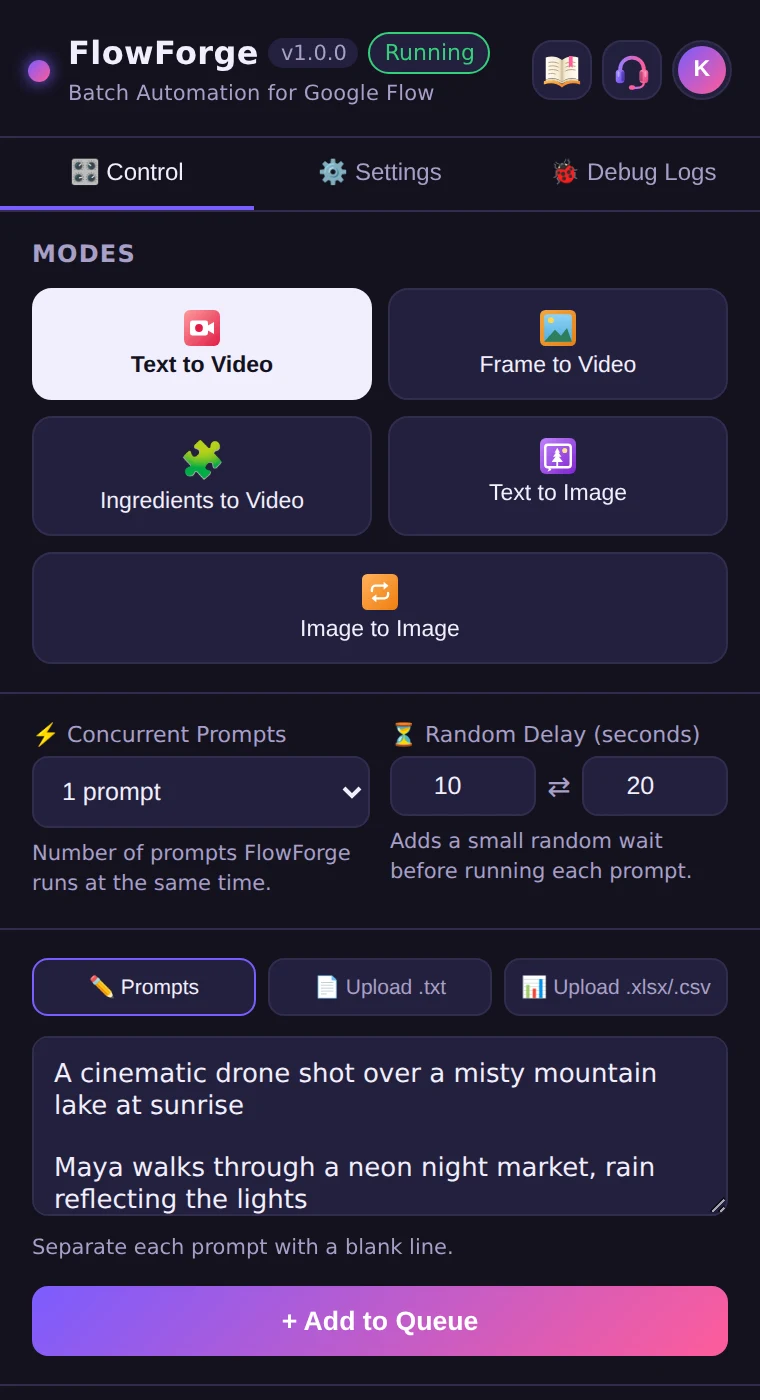
Top bar. The FlowForge name, version and a status pill that reads Idle, Running or Paused. On the right are three buttons. Hover over any of them to see its name.
Opens this guide.
Opens our contact and social links. See Support.
Opens your account page.
Alert card. Appears under the top bar only when something needs your attention, such as an option that is locked on your Flow plan or a Flow page that needs a refresh. See Troubleshooting.
Tabs.
Choose a mode, add prompts and run the queue.
Models, default options, download quality and language.
A live record of every step FlowForge takes.
Footer. Shows the connection status: Connected: Google Flow when your Flow tab is open, or No Flow tab detected when it isn't.
Modes
Choose a mode at the top of the Control tab. The panel only shows the options the selected mode uses.
Creates a video from your prompt.
Creates a video that starts from your image, and can end on a second image.
Creates a video guided by up to 6 reference images per prompt.
Creates images from your prompts.
Creates new images based on up to 6 reference images per prompt.
Which options each mode uses:
| Mode | Reference images | Characters | Voices | Style consistency |
|---|---|---|---|---|
| Text to Video | — | Yes | Yes | — |
| Frame to Video | 1 or 2 per prompt | — | — | — |
| Ingredients to Video | 1 to 6 per prompt | Yes | Yes | — |
| Text to Image | — | Yes | — | Yes |
| Image to Image | 1 to 6 per prompt | Yes | — | — |
Video modes create videos in 16:9 or 9:16 only. The other aspect ratios in Settings apply to the image modes.
Prompts
There are three ways to add prompts on the Control tab:
Type or paste your prompts. Leave one blank line between prompts. A single prompt can run over several lines, as long as there is no blank line inside it.
Loads the file's text into the Prompts box, using the same blank-line format.
One prompt per row, taken from the first column. A header row such as Prompt is skipped automatically.
When your prompts are ready, click + Add to Queue. Each prompt in the queue keeps the mode, model and aspect ratio that were selected when you added it, so you can add several batches with different settings.
Reference images
Frame to Video, Ingredients to Video and Image to Image use your own images. Click the upload area or drag images onto it. PNG, JPG, WEBP and GIF are supported, and you can add many at once. In the other two modes this section is hidden.
How images are matched to prompts
Images are given to prompts in the order shown in the grid: the first prompt takes the first image (or images), the next prompt takes the next ones, and so on. Drag an image to move it, click × to remove it, or click Clear all to start over.
Number your files before uploading (01, 02, 03…) so they arrive in the right order, then check the preview box before you click Add to Queue. It shows exactly which images each prompt will get.
Frame Mode (Frame to Video)
1 image per prompt. The video begins from that image.
2 images per prompt. The first becomes the Start frame and the second becomes the End frame.
The Frame Preview for this Batch shows the Start and End frame of each prompt.
Images per prompt (Ingredients to Video and Image to Image)
How many images each prompt uses, from 1 to 6.
Give prompts different numbers of images with a list. For example, 1, 3, 2 gives the first prompt 1 image, the second 3 and the third 2. Prompts not covered by the list use Max Images per Prompt.
The Ingredients Preview or Image to Image Preview for this Batch shows which images each prompt will use.
Characters
FlowForge uses the characters you've saved in Google Flow, so the same character can appear across a whole batch. Characters work in every mode except Frame to Video.
On: FlowForge attaches a character only to prompts that mention its name. Off: use Default characters instead.
Reads the characters saved in your Flow account. Keep your Flow tab open, and scan again whenever you add new characters in Flow. Show characters lists every name found.
The characters you tick are attached to every prompt. This is disabled while Auto-add character is on.
Names are matched as whole words and are not case-sensitive, so write the name as it is saved in Flow. For example, a character saved as Maya is added to a prompt that says “Maya walks into the room”. The Character Preview for this Batch shows which characters each prompt will get, and queued prompts show them with a 👤 label.
Voices
In Text to Video and Ingredients to Video, FlowForge can select a speaker voice using Flow's own speaker voices.
On: a speaker's voice is selected when their name appears in the prompt. Off: use Default speakers instead.
A voice to use for every prompt. Disabled while auto-add is on.
Shows every speaker name you can use in your prompts.
Speaker names are matched as whole words and are not case-sensitive. For example, if a speaker is named Aria, a prompt that says “Aria explains the plan” uses her voice. The Voice Preview for this Batch shows which voice each prompt will use.
Style consistency
Available in Text to Image. Each new image uses the previous one as a reference, so the style, characters and look stay the same across a series. The first prompt of a batch always starts fresh.
Use it when you want a set of images to look like one series, for example the same character or the same art style across ten prompts.
While Style Consistency is on, Concurrent Prompts is locked to 1, because every image depends on the one before it.
Speed and outputs
How many prompts run at the same time, from 1 to 8. Higher is faster but puts more load on Flow.
A random wait, between the two numbers you set, before each prompt. The default is 10 to 20 seconds, which keeps a steady, natural pace.
How many results Flow creates for each prompt, from 1 to 4.
The more prompts run at once, the fewer outputs each prompt can have. This keeps Flow's page from overflowing:
| Concurrent Prompts | Image modes: max outputs | Video modes: max outputs |
|---|---|---|
| 1–2 | 4 | 4 |
| 3 | 4 | 2 |
| 4 | 2 | 2 |
| 5 | 2 | 1 |
| 6–8 | 1 | 1 |
If you're not sure, start with 2 or 3 concurrent prompts and the default delay. Raise it only if Flow keeps up.
Downloads
The folder inside Chrome's Downloads folder where files are saved. The default is FlowForge.
On: every image and video is saved the moment it's ready. Off: FlowForge only generates, and nothing is saved until you download it yourself from the Flow page.
On: file names contain a number plus a short part of the prompt, for example 01_a_lighthouse_at_dawn_1a2b3c4d.mp4. Off: just a number and a short code, for example 01_1a2b3c4d.mp4.
Videos are saved as .mp4 and images as .jpg. Download quality is chosen on the Settings tab.
If Chrome is set to Ask where to save each file before downloading, a save window can open for every file. Turn it off in Chrome at Settings › Downloads for smooth batches.
The prompt queue
Everything you add appears in the Prompt Queue, with the number of prompts next to it. Each item shows its number, the prompt, any characters, voices or images it will use, its mode, model and aspect ratio, and a status:
Begins working through the queue. The status pill changes to Running.
Stops FlowForge from starting new prompts. Click Start to continue.
Removes finished prompts from the list.
Removes prompts that haven't started yet.
Retries. If Flow fails to generate a prompt, FlowForge retries it automatically, up to the number set in Max Retries on Failure, and the status shows the retry count. If it still fails, the prompt is marked failed and a ↻ button appears next to it. Click it to put that prompt back in the queue.
Keep the Flow window visible while a batch runs. Chrome slows down pages in windows that are minimized or completely covered by other windows. You can make the window smaller or place it beside your other work. Just don't minimize it or hide it fully.
Settings
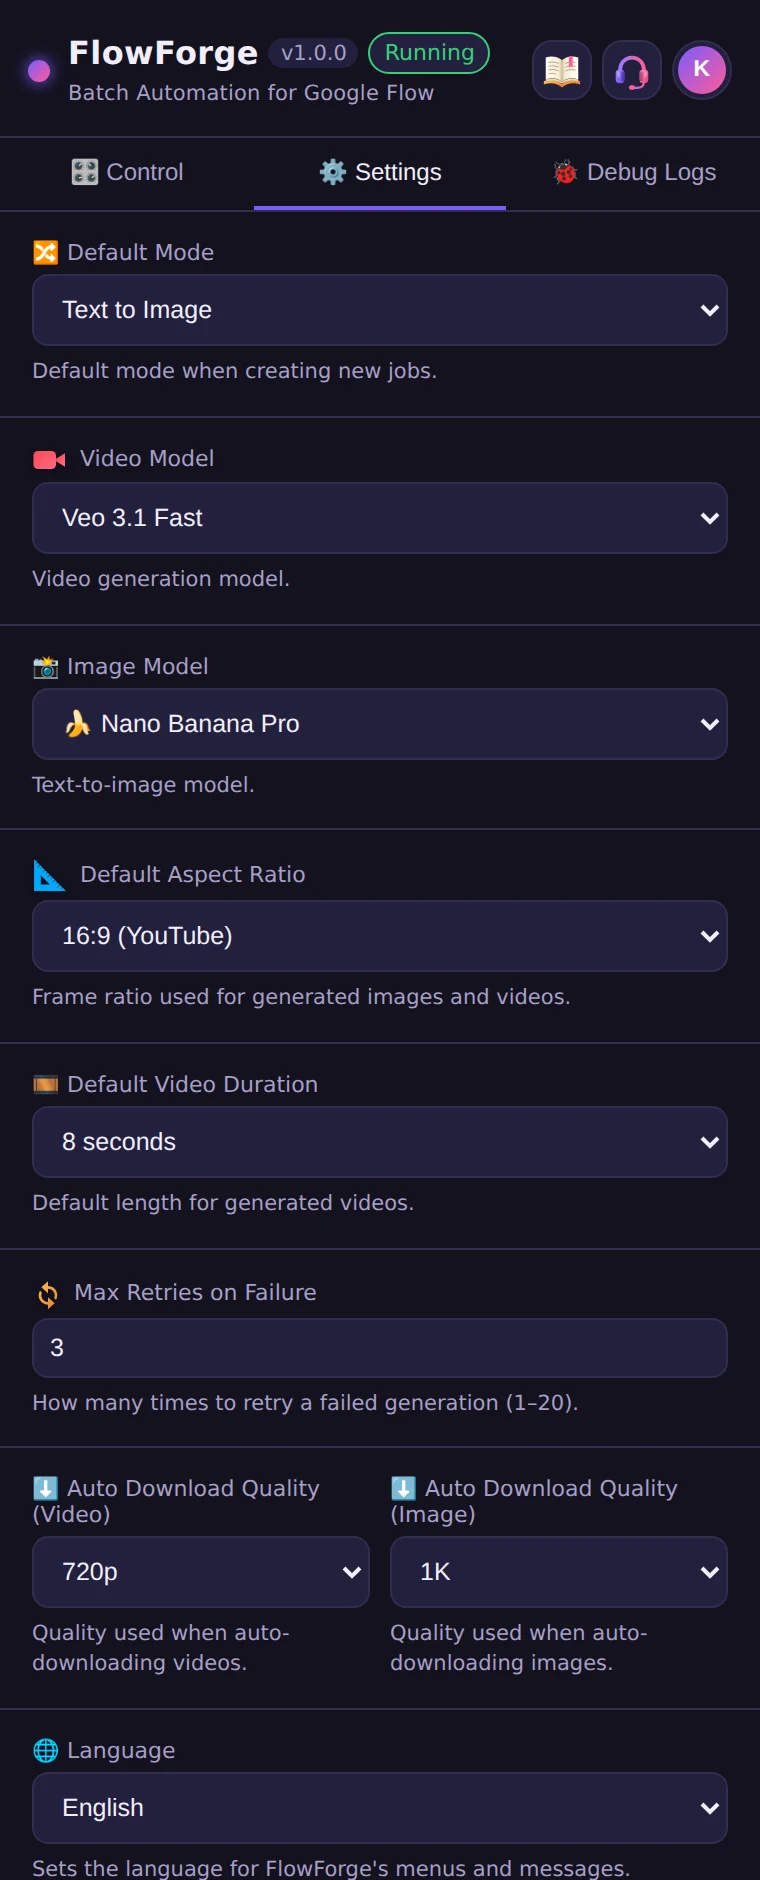
The mode selected when you open the panel.
Veo 3.1 Lite, Veo 3.1 Fast (default), Omni Flash, Veo 3.1 Quality (Plus, Pro or Ultra plan required) and Veo 3.1 Lite [Lower Priority] (Ultra plan required).
360p or 720p. Shown only when Omni Flash is the video model.
Nano Banana Pro, Nano Banana 2 or Nano Banana 2 Lite.

16:9 (YouTube), 9:16 (Shorts/Reel), 1:1 (Square), 3:4 (Portrait) or 4:3 (Landscape).
4, 6 or 8 seconds (default 8). 10 seconds is available with Omni Flash only.
How many times a failed generation is retried, from 1 to 20 (default 3).
720p, 1080p (Plus, Pro or Ultra plan required) or 4K (Ultra plan required). When Omni Flash is set to 360p, the choices are 360p and 720p.
1K, 2K or 4K (Ultra plan required).
The language of FlowForge's menus and messages. 11 languages are available. Sign-in, your account page, Support and the welcome tour always stay in English.
Click ✓ Save to keep your changes. ↺ Reset Defaults asks for confirmation, then returns every Settings option to its default. Your prompt queue and logs are not affected. Settings stay in sync across every open Flow tab.
Debug Logs
The Debug Logs tab records every step FlowForge takes. It's the fastest way to see what happened if something goes wrong.
Keeps the newest entries in view.
Copies the whole log so you can paste it into a message to support.
Empties the log.
Support
Click the Support button at the top of the panel. It lists every way to reach us, such as email and WhatsApp, and our channels for updates and tutorials. Click a link to open it in a new tab. The same links are on our Contact page.
If the links can't load, you'll see Something went wrong loading support links. Check your internet connection and click Retry.
Before you write to us, open Debug Logs, click Copy and paste the log into your message, and tell us which mode you were using. It helps us answer in one reply.
Troubleshooting
"No Flow tab detected"
Open flow.google.com in a tab of the same Chrome window and open a project. The footer changes to Connected: Google Flow.
"Couldn't Send Prompt" or "Refresh Required"
Refresh the Flow page and click Start again. If it keeps happening, go to chrome://extensions, click the reload button on FlowForge, then refresh Flow.
"Locked" or "Upgrade Required"
The model or download quality you chose isn't available on your current Google Flow plan. For example, 4K needs the Ultra plan and 1080p needs Plus or Pro. Choose another option in Settings, or upgrade your Flow plan with Google.
A batch slows down or stops moving
Make sure the Flow window isn't minimized or completely covered. Lowering Concurrent Prompts and raising the Random Delay can also help when Flow is busy.
A prompt shows "failed"
FlowForge already retried it up to your Max Retries setting. Check Debug Logs for the reason, then click ↻ next to the prompt to try it again.
Characters or voices aren't added
Click Scan Characters again, and check that the name in your prompt matches the saved name as a whole word. Characters don't apply to Frame to Video, and voices only apply to Text to Video and Ingredients to Video.
The wrong image went to a prompt
Images follow the order in the grid. Drag them into the right order and check the preview box before adding the batch to the queue.
Files aren't downloading
Check that Auto Download is on and that the chosen download quality is available on your plan. Then look in the folder named in Save to folder, inside Chrome's Downloads folder.
You were signed out
Your account was probably signed in on another browser. Sign in again and choose Log out from other device if asked.
FAQ
Does FlowForge use my Flow credits?
Yes. FlowForge submits prompts through your own Google Flow account, so each generation uses your Flow plan and credits, exactly as if you had submitted it by hand.
Do I need a paid Google Flow plan?
No. FlowForge works with any Google Flow account. Some models and download qualities need a paid Google plan (Plus, Pro or Ultra), and FlowForge shows which ones in its menus.
Is FlowForge made by Google?
No. FlowForge is an independent product by Z&K Automations and is not affiliated with, endorsed by or sponsored by Google.
Where are my images and videos saved?
In a FlowForge folder inside your computer's Downloads folder. You can change the folder name in Save to folder.
Can I use my account on two computers?
You can use any computer, but only one can be signed in at a time. Signing in on a new one gives you the option to log out the other.
How do I see the welcome tour again?
Open your account page with the round button at the top right and choose Replay tour.
Why are some screens always in English?
Sign-in, your account page, Support and the welcome tour are kept in English so they always match our help and support. Everything else follows the language you choose in Settings.
How do I delete my account?
Email us at zk.automations.official@gmail.com from the address you registered with and ask for your account to be deleted. See the Privacy Policy for details.